Today I want to introduce my co2monitor.app, which I wrote to match my co2monitor.api project to visualize the recorded and stored readings. I chose Flutter because I think it’s a great overall package with Dart to write cross-platform apps. The app retrieves the REST interface of the co2monitor.api and displays the measured values in two graphs. It also offers a configuration page to set the connection to the API.
Animated presentation of the app
The basic framework
As I said before, I decided to use Flutter and Dart as a base. The most important libraries are probably riverpod for state management, http for querying the API, fl_chart for creating the charts, and shared_preferences for storing user preferences. To convert the API responses from JSON to Dart objects, I used the quicktype.
The providers
Riverpod offers the possibility to create providers with and without code generation. I tried both variants, which can be seen in the code. In the end, I find the code generation a bit more confusing and will probably not use it in the future for now. The authors of Riverpod write themselves that the Dart team is still working on the implementation of the code generation, so let’s wait and see what will come.
For this reason I would like to deal here only with the InitStateProvider. This provider uses the AsyncNotifierProvider and is called in the main method. It is responsible for loading the user settings and retrieving or saving the connection data to API. Here once the setInitState function, which saves the user settings by means of shared_preferences.
Future<void> setInitState(bool wasInit, String apiUrl, String apiKey) async {
    var value = InitState(
        wasInit: wasInit,
        apiUrl: apiUrl,
        apiKey: apiKey,
    );
    final prefs = await SharedPreferences.getInstance();
    prefs.setBool(prefKeyWasInit, wasInit);
    prefs.setString(prefKeyApiUrl, apiUrl);
    prefs.setString(prefKeyApiKey, apiKey);

    state = AsyncData(value);
}
The Widgets
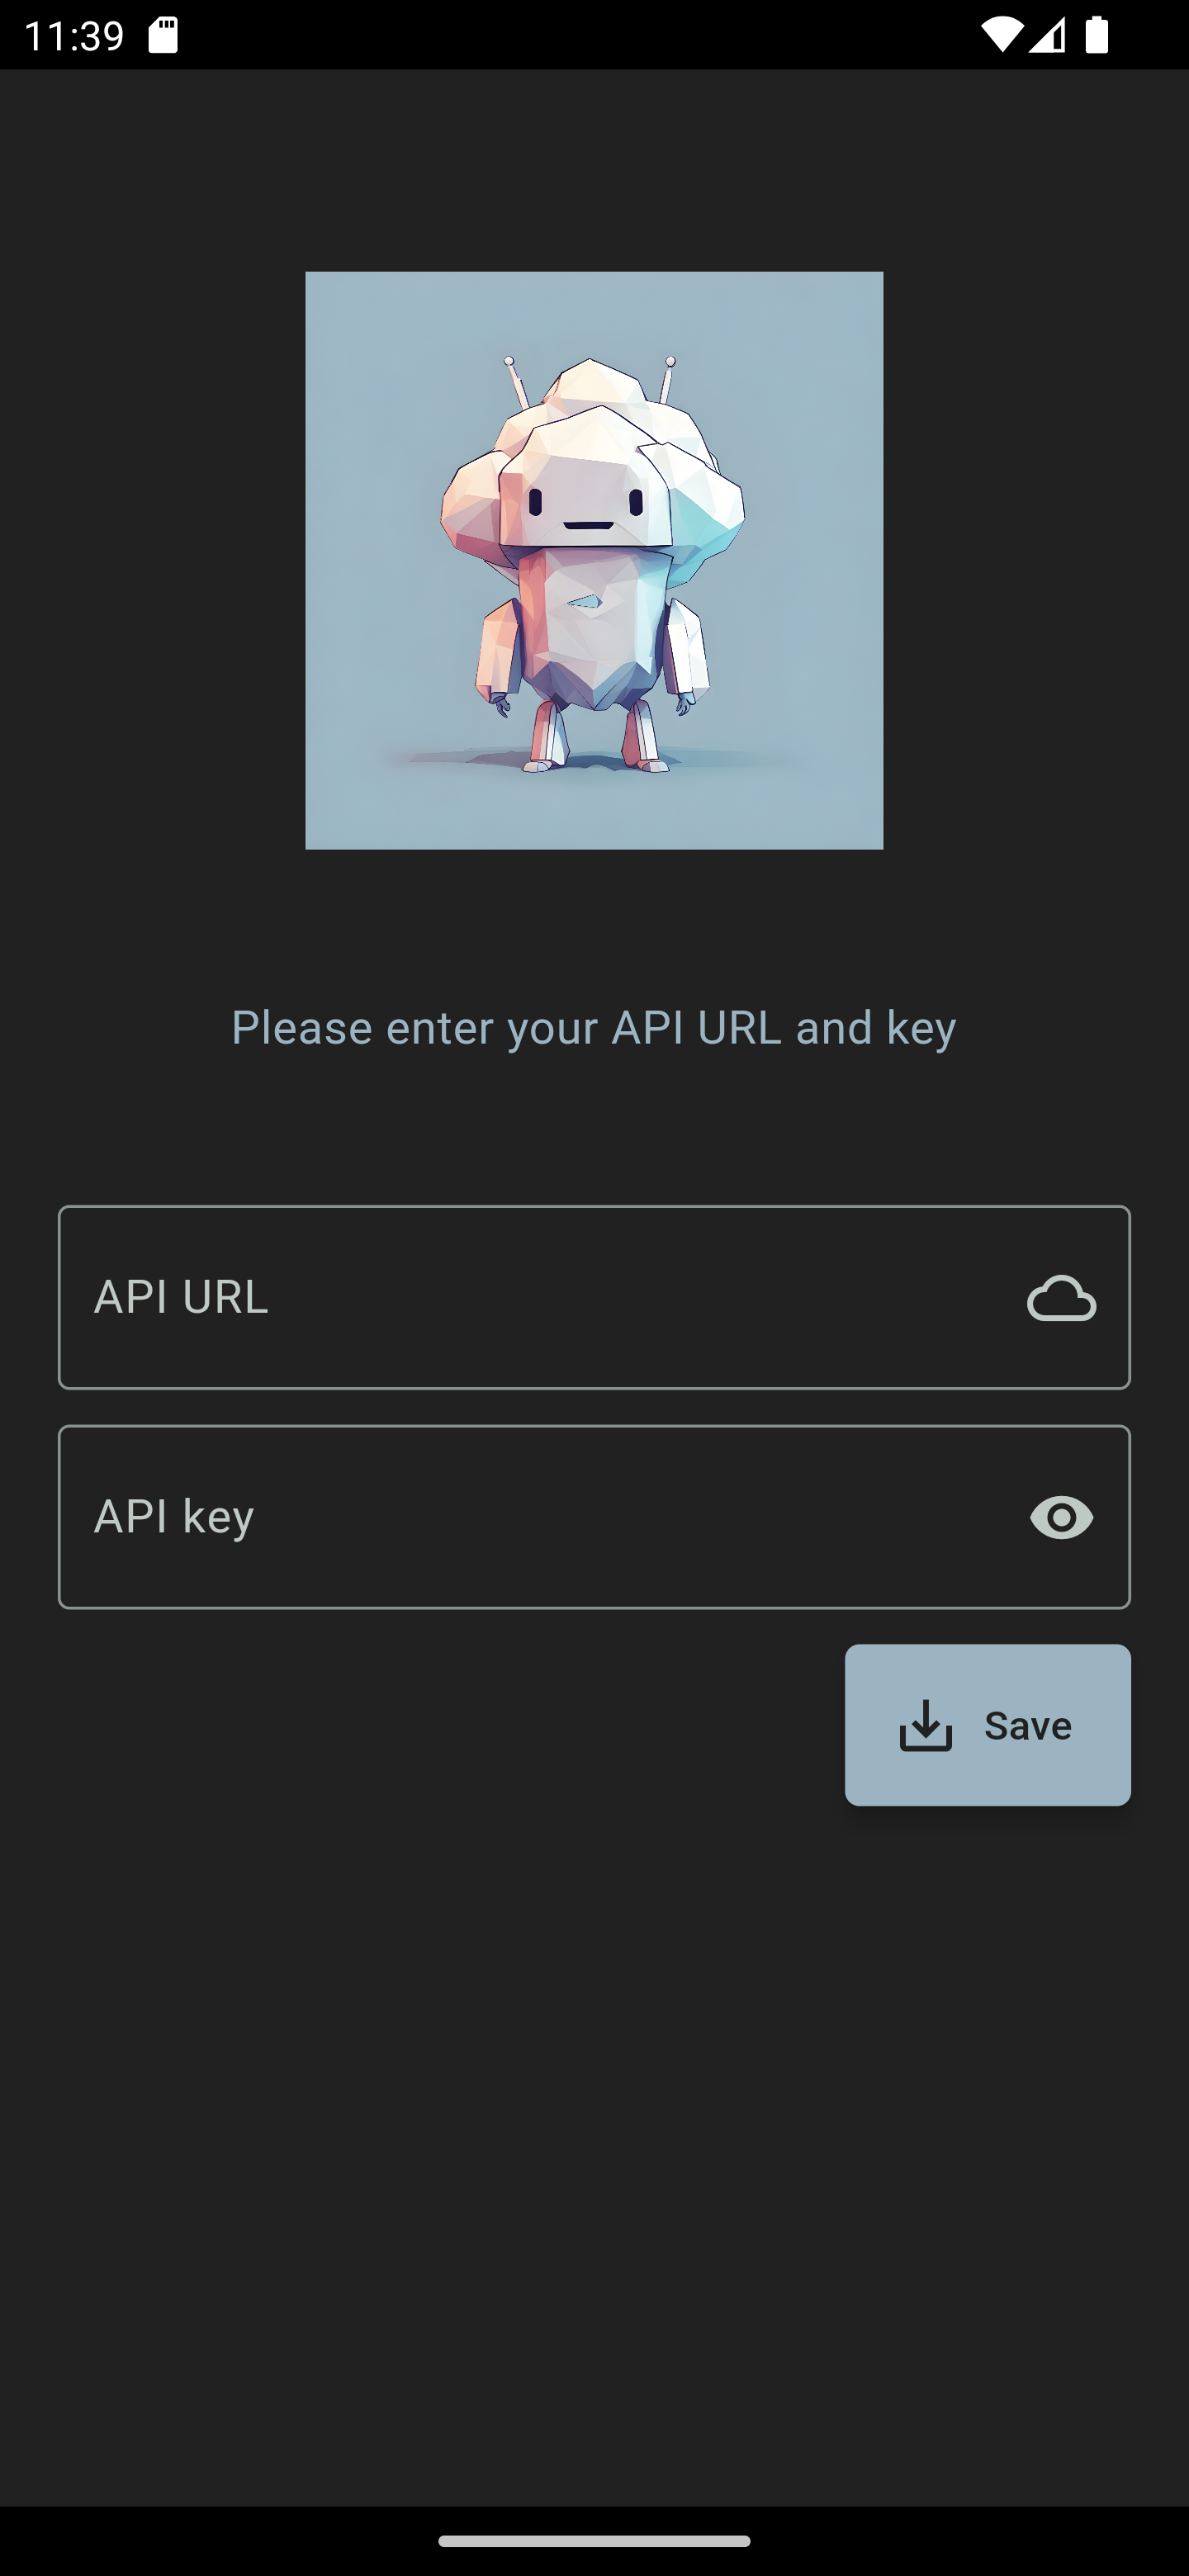
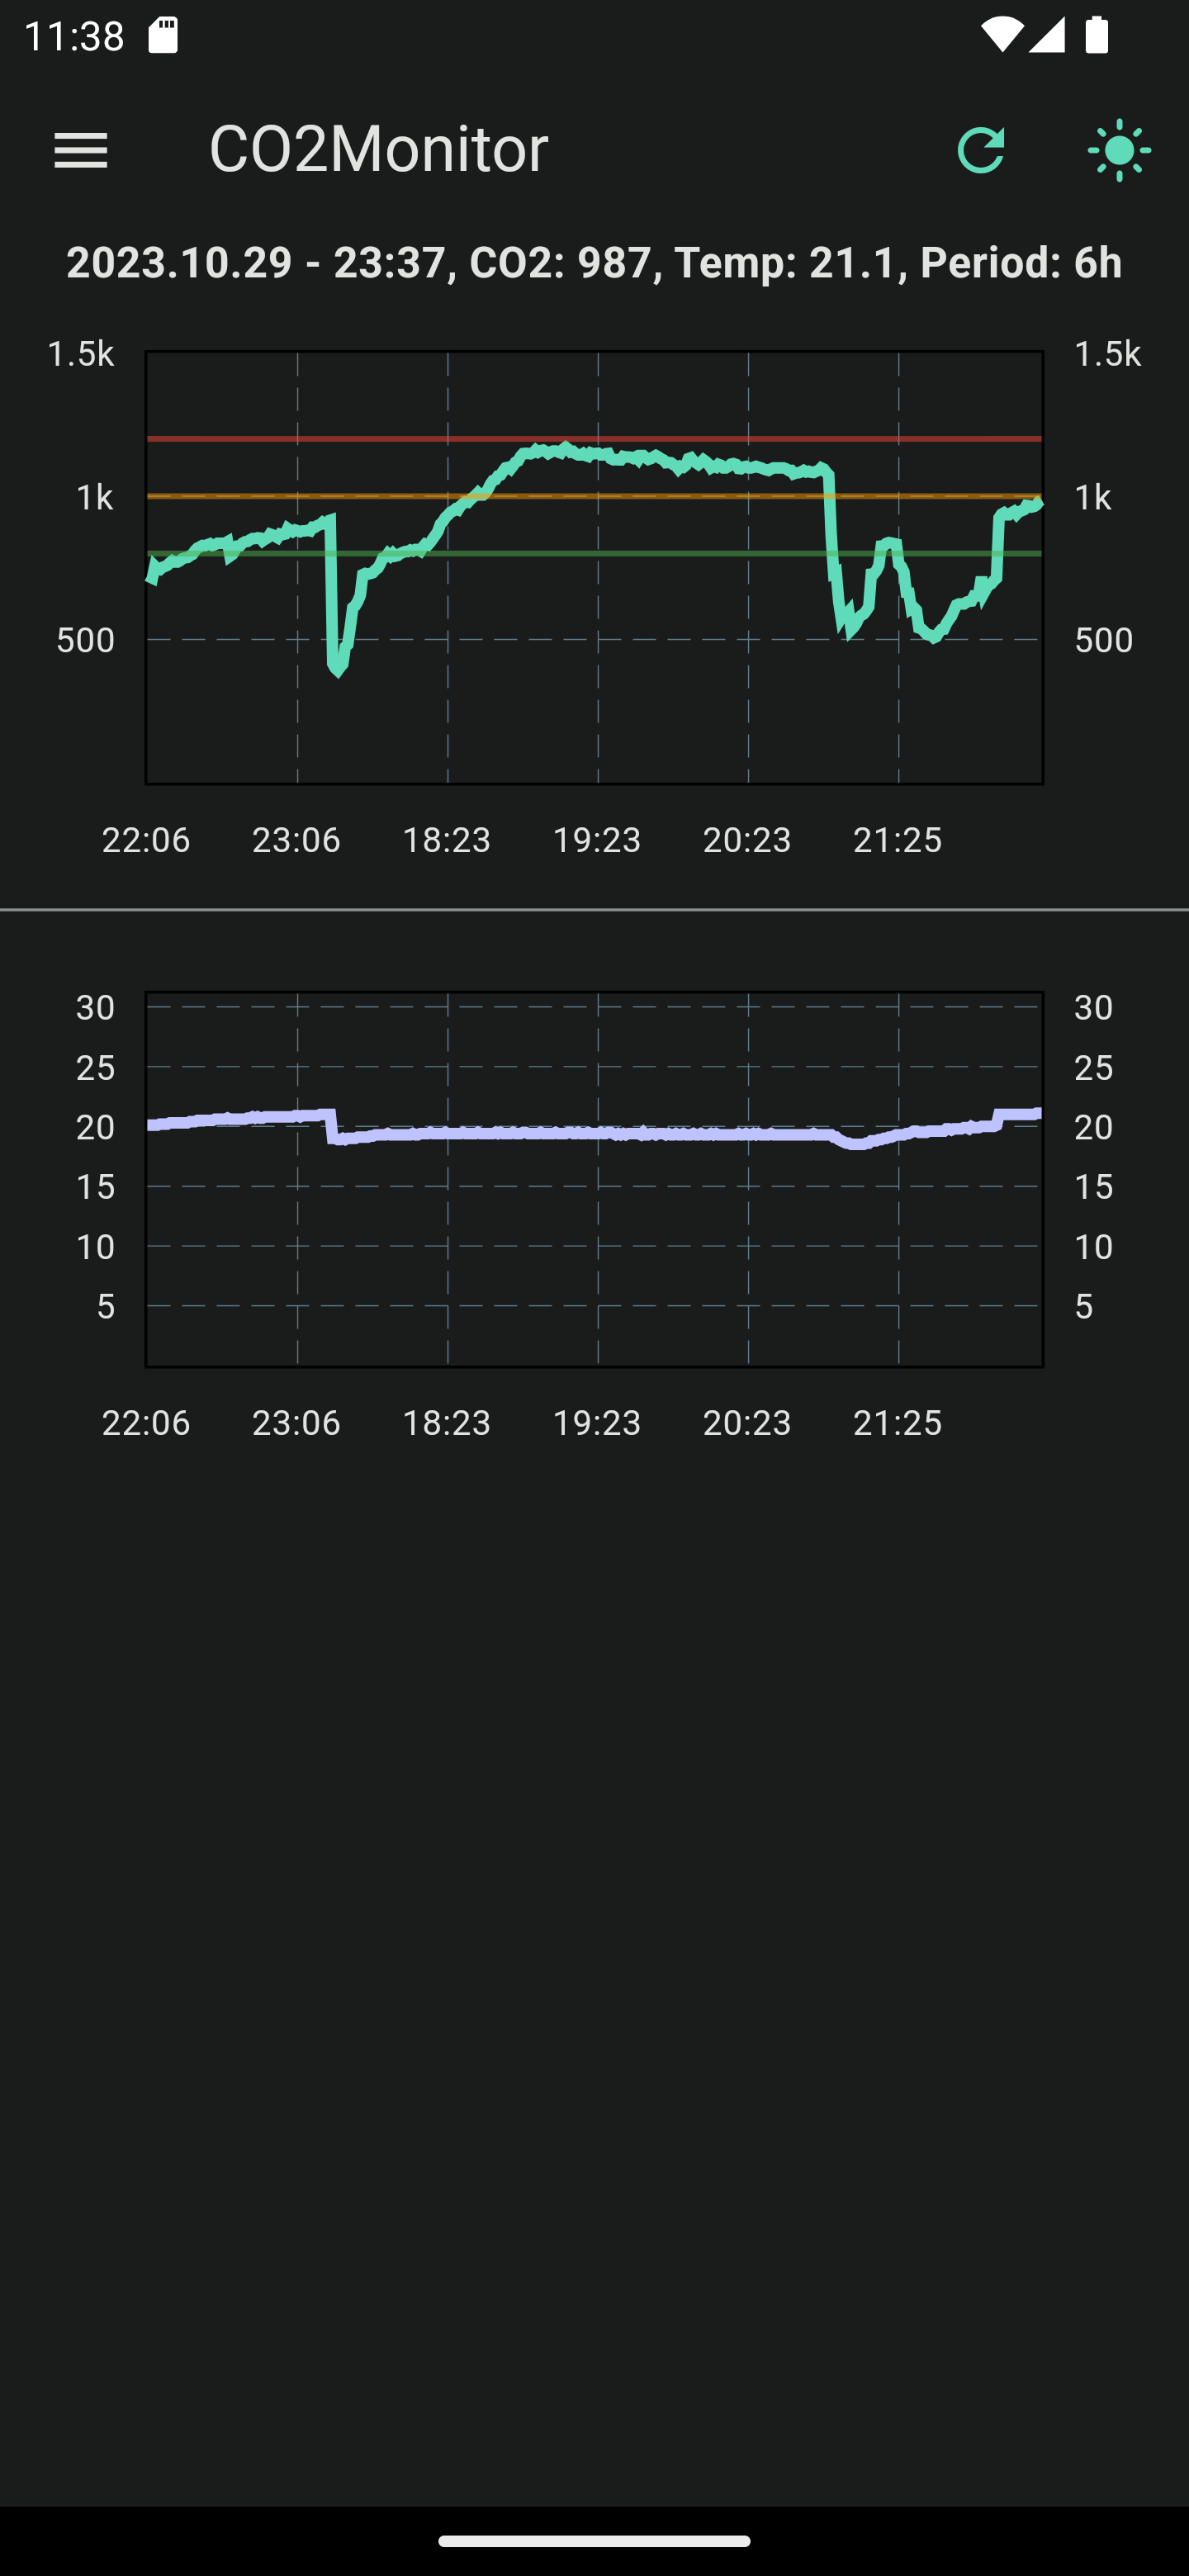
| Configuration page | Main-Screen | Drawer |
|---|---|---|
|
|
|
There are the following widgets:
- The configuration page, where the connection data to the API can be set
- The main page, where the diagrams are displayed
- The drawer that allows navigating between the pages and the settings related to the time interval to be queried
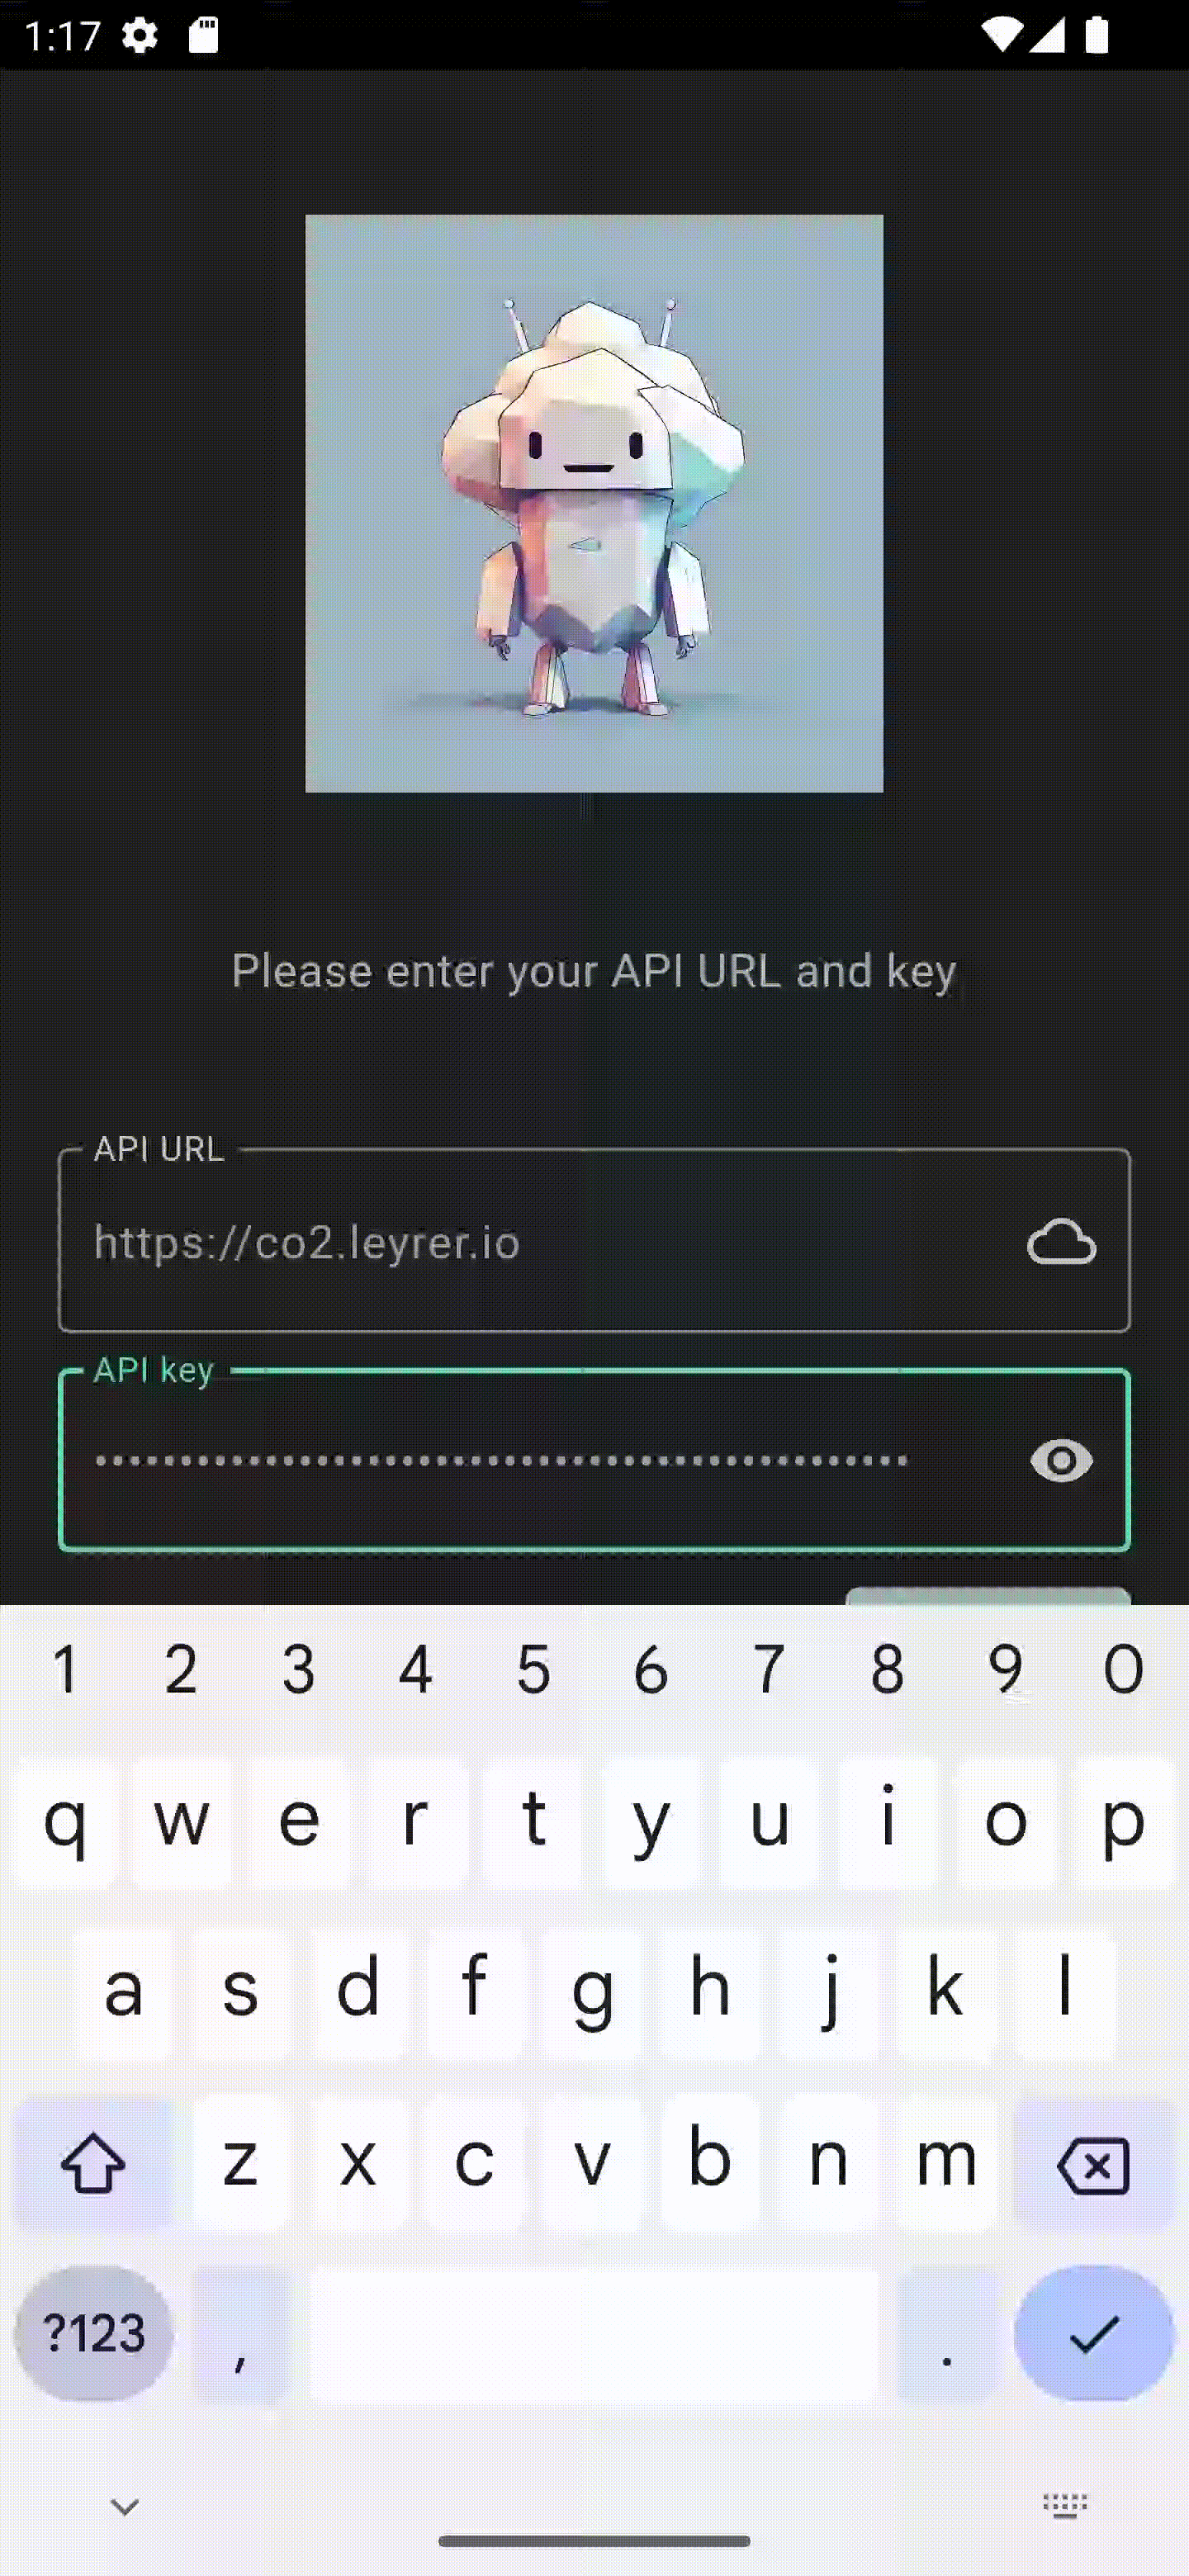
The configuration page
The configuration page is a ConsumerStatefulWidget of Riverpod, because the user inputs have to be stored and passed to the InitStateProvider. The inputs are collected in a Form widget and read in with a TextFormField. The inputs are saved with the onSaved callback. The _saveForm function is called when the Save button is pressed. It calls the setInitState function of the InitStateProvider to save the user settings. To prevent the API key from being displayed in plain text, the obscureText parameter of the TextFormField is set to true. The Toggle button calls the _toggleObscureText function which inverts the obscureText parameter to allow verification of the API key.
class _InitScreenState extends ConsumerState<InitScreen> {
  final _formKey = GlobalKey<FormState>();
  String _apiKey = "";
  String _apiUrl = "";
  bool _obscureText = true;

  void _saveForm() {
    final isValid = _formKey.currentState!.validate();
    if (!isValid) {
      return;
    }
    _formKey.currentState!.save();

    ref.read(initStateProvider.notifier).setInitState(true, _apiUrl, _apiKey);
  }

  void _toggleObscureText() {
    setState(() {
      _obscureText = !_obscureText;
    });
  }

  @override
  Widget build(BuildContext context) {
    \\ ... Widget tree
  }
The main page and the charts
The main page as well as the charts are each a ConsumerStatefulWidget from Riverpod, as the charts need to visualize the data from the API and the data is constantly updated. When initializing the main page, the theme is queried and set first. The theme can be switched from dark to light and vice versa using the button and onTabTheme function. The data can be retrieved again using _onTabRefresh. The status of the query is displayed via a snack bar.
```dart
class _MainScreenState extends ConsumerState<MainScreen> {
  @override
  void initState() {
    super.initState();
    ref.read(themeNotifierProvider);
  }

  void onTabTheme(MyTheme theme) {
    ref.read(themeNotifierProvider.notifier).setTheme(!theme.isDark);
  }

  Future<void> _onTabRefresh(BuildContext context) async {
    final messageProv = ref.read(messageStateNotifierProvider.notifier);
    messageProv.showLoadingSnackBar(context);

    try {
      await ref.read(dataProvider.notifier).getData();
      if (context.mounted) {
        messageProv.showSuccessSnackBar(context, "Data successfully refreshed");
      }
    } catch (err) {
      if (context.mounted) {
        messageProv.showErrorSnackBar(
            context, "Data could not be loaded.\n$err");
      }
    } finally {
      if (context.mounted) {
        messageProv.hideSnackBar(context);
      }
    }
  }

  @override
  Widget build(BuildContext context) {
    final themeProv = ref.watch(themeNotifierProvider);
    // ... Widget tree
}
The diagrams are arranged in a ListView so that they can also be displayed on smaller screens. The data is retrieved via Riverpod’s dataProvider. The dataProvider is a FutureProvider that retrieves the data from the API and stores it in an AsyncValue object. The AsyncValue object can take three states: AsyncLoading, AsyncError and AsyncData. Depending on the state, a CircularProgressIndicator, an error message or the diagrams are displayed. The data is updated every minute by starting a timer that polls the data again. Important here is the dispose function, which stops the timer when the page is no longer displayed.
class LineChartScreenState extends ConsumerState<LineChartScreen> {
  Timer? _timer;

  @override
  void initState() {
    super.initState();
    ref.read(periodNotifierProvider);
  }

  Future<void> fetchLatestDataEveryMinute(BuildContext context) async {
    _timer?.cancel();
    _timer = Timer.periodic(const Duration(seconds: 60), (_) async {
      final latestData =
          await ref.watch(latestDataProvider.notifier).updateLatestData();
      await ref.watch(dataProvider.notifier).updateData(latestData);
    });
  }

  @override
  void dispose() {
    _timer?.cancel();
    super.dispose();
  }

  @override
  Widget build(BuildContext context) {
    final dataProv = ref.watch(dataProvider);
    final latestDataProv = ref.watch(latestDataProvider);
    final dateFormatter = ref.watch(dateFormatterProvider);
    final periodProv = ref.watch(periodNotifierProvider);

    fetchLatestDataEveryMinute(context);

    return dataProv.when(
      data: (data) => ListView(
        children: <Widget>[
          latestDataProv.when(
            data: (latestData) => Center(
              // ... some Text
            ),
          ),
          Co2LineChartWidget(data),
          Divider(
            color: Theme.of(context).colorScheme.outline,
          ),
          TempLineChartWidget(data),
        ],
      ),
      error: (err, _) => Center(
        child: Text("Data could not be loaded: \n$err"),
      ),
      loading: () => Center(
        child: CircularProgressIndicator(
          color: Theme.of(context).colorScheme.primary,
        ),
      ),
    );
  }
}
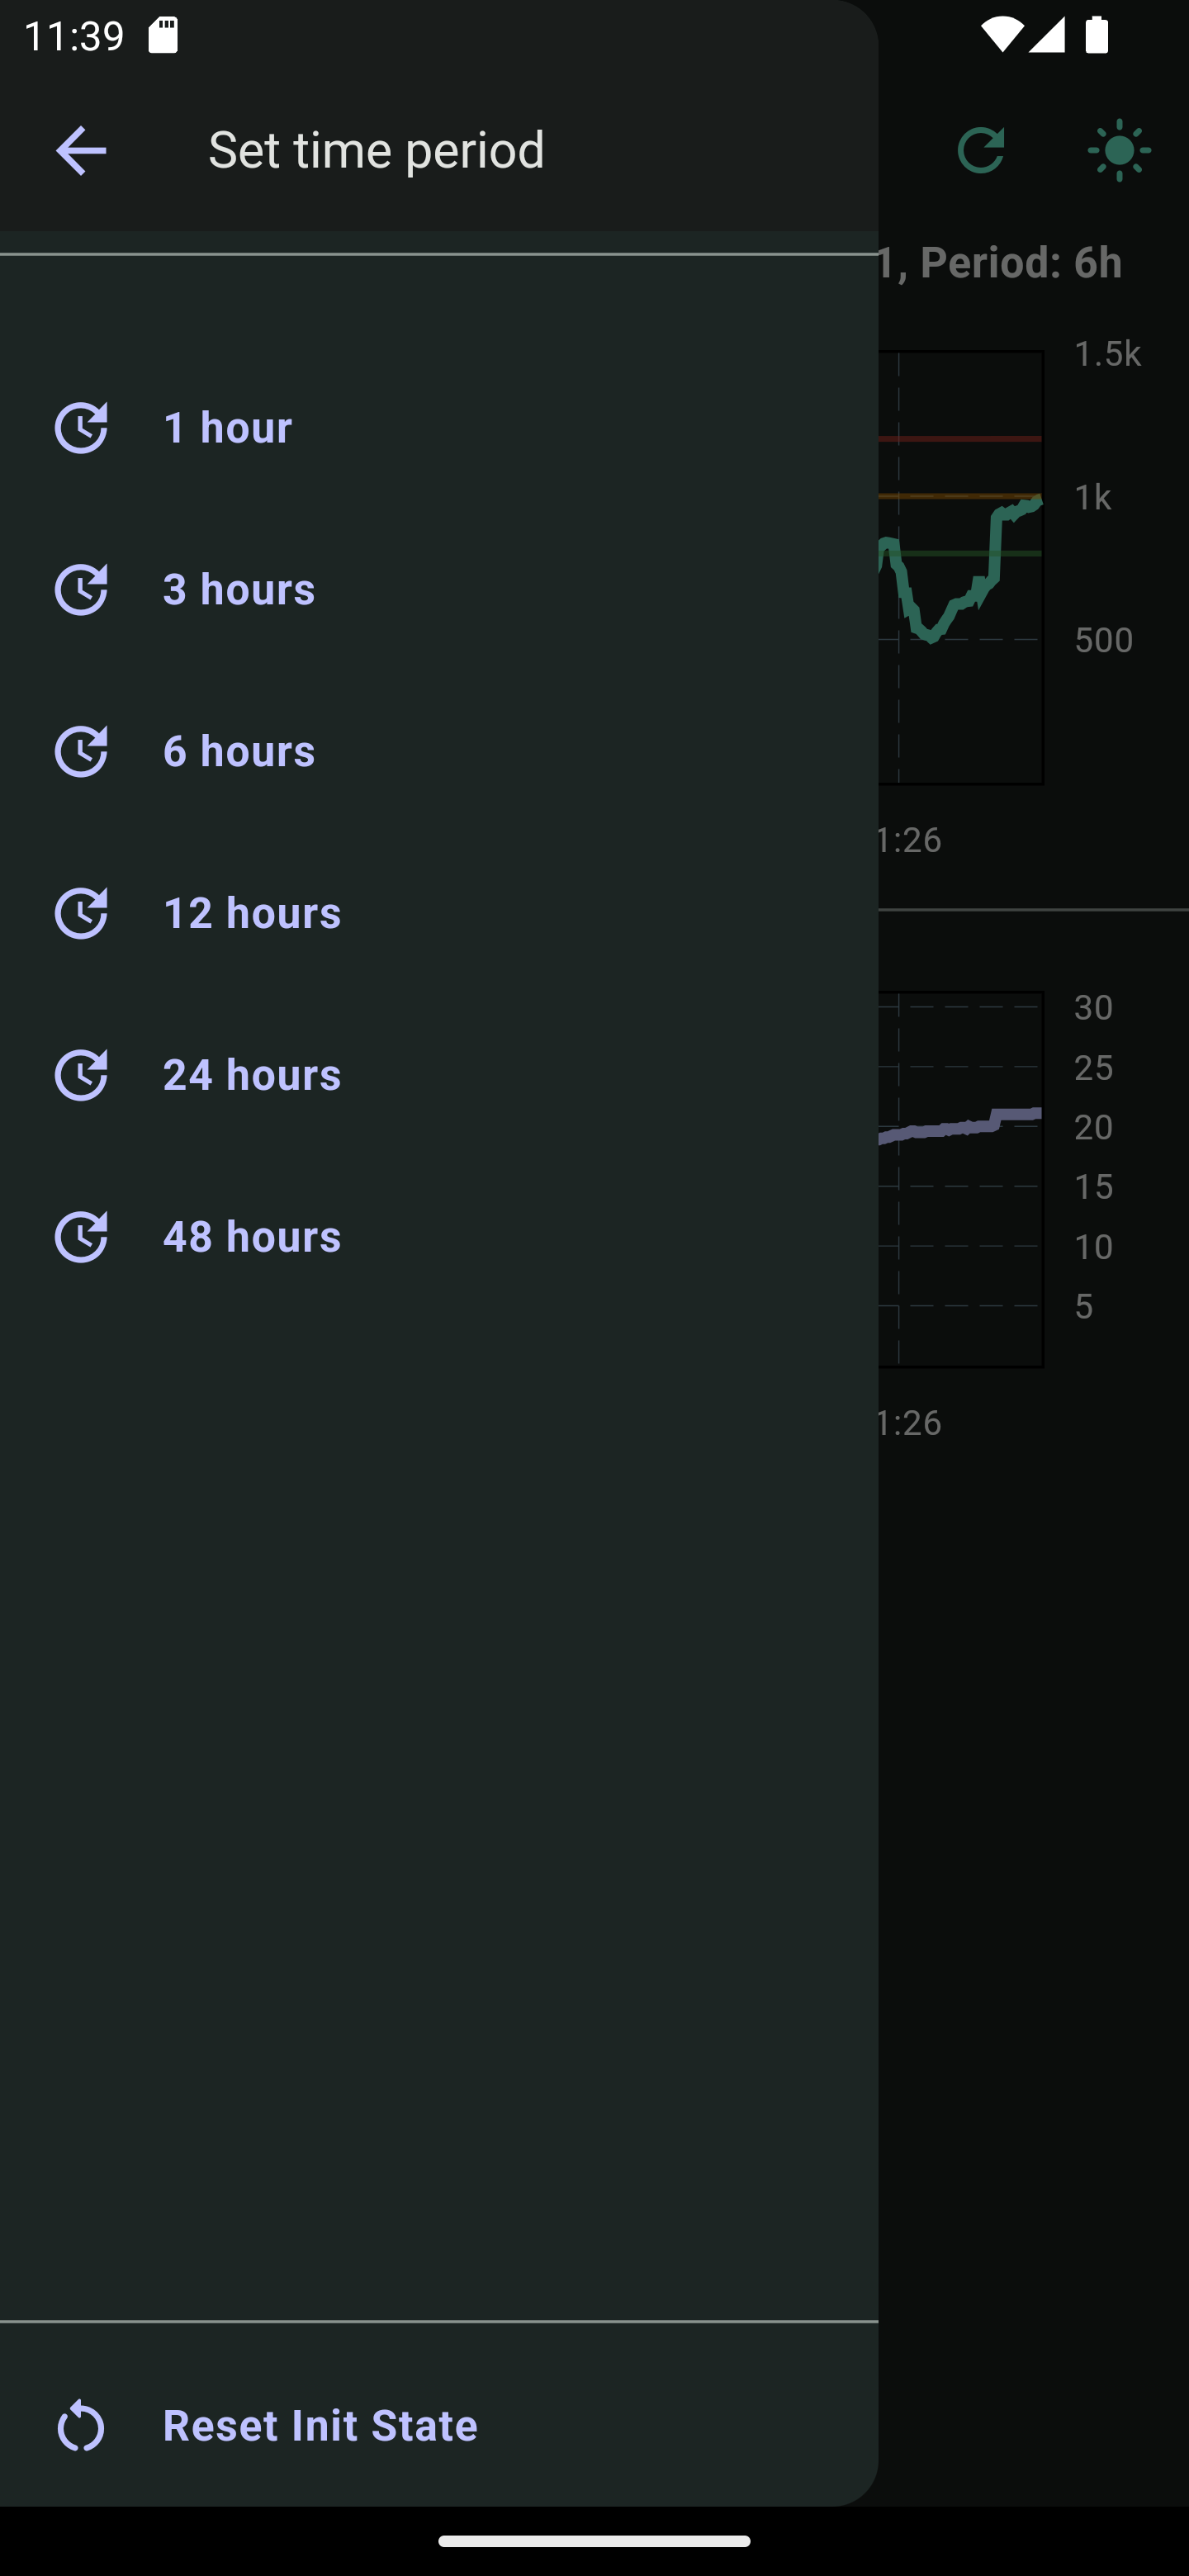
The Drawer
The Drawer offers the option of setting the time period for querying the data. Here, hard-coded one, three, six, twelve, 24 and 48 hours are available for selection. It is also possible to reinitialize the app here by pressing the “Reset Init State” button. The resetInitState function of the InitStateProvider is called to reset the user settings.
The CI/CD pipeline
I have the app built automatically using GitHub actions. To do this, I created a workflow file that uses Ubuntu as the base, then installs Flutter and Dart and builds the app. The app is then published as a release on GitHub. This required a GitHub repository secret, which can be created via the repository -> Settings -> Secrets and variables -> Actions. The app is only built when a new tag is created.
The workflow file looks like this:
name: Build and Release Flutter App

on:
    push:
        tags:
            - "v*.*.*"

jobs:
    build:
        runs-on: ubuntu-latest
        permissions:
            contents: write
        env:
            GITHUB_TOKEN: ${{ secrets.SUPERSECRET }}
        steps:
            - name: Checkout
              uses: actions/checkout@v3

            - name: Setup Java
              uses: actions/setup-java@v2
              with:
                  distribution: "zulu"
                  java-version: "11"

            - name: Set up Flutter
              uses: subosito/flutter-action@v2
              with:
                  flutter-version: "3.13.6"
            - run: flutter pub get

            - run: flutter build apk --release

            - name: Release
              uses: softprops/action-gh-release@v1
              with:
                  files: |
                      build/app/outputs/flutter-apk/app-release.apk
                  tag_name: ${{ github.ref }}
                  token: ${{ secrets.SUPERSECRET }}
Animated presentation of the app
Conclusion
I wrote an app with Flutter that visualizes the data from my CO2 monitor. Retrieving and updating every minute works fine, also the app is built automatically when creating a new tag. There are still a few customizations like selecting the location or making all providers follow the same scheme. Nevertheless, I am very happy with the result. 🥳